So, you want to set up Cloudflare for your WordPress website? Cloudflare is a content delivery network (CDN) and offers other services, more so than you’d typically expect for a free service. You can also use Cloudflare to speed up your site, provide DNS services, protect your site from distributed denial of services (DDoS) attacks and more.
What is a CDN?
A CDN is a network of servers distributed around several different geographic locations; these servers allow you to deliver your website to users faster by sending them from the server nearest to the user's location.
Most web hosting services deliver your site from a single location, meaning that your website can take longer to load for users far from your host server location.
A Content Delivery Network stores copy of the original files from your host's server and then stores them on the servers worldwide, ready to be served to your users. Using a CDN, you increase the locations available for your users to load your site from, so your files load quickly regardless of the user's location.
Why use Cloudflare?
Aside from the usual CDN benefits, Cloudflare also offers a free SSL certificates, easy-to-use DNS and protection from DDoS attacks:
- CDN – A content delivery network helps to speed up your site by serving your static content from a network of global servers.
- DDoS Protection – Protect your WordPress site against distributed denial of service (DDoS) attacks. What Is a Distributed Denial-of-Service (DDoS) Attack? | Cloudflare
(A distributed denial-of-service attack is a malicious attempt to overwhelming the target or its surrounding infrastructure with a flood of Internet traffic, causing a disruption or outage of service.) - SSL – if your site doesn’t already have an SSL certificate, Cloudflare can help you use HTTPS on your WordPress site.
- DNS – A fast DNS provider can speed up your site’s 'time to first byte' or TTFB.
- Other benefits – Cloudflare can also minify your code, enable Brotli compression, and implement other performance improvements.
(Brotli is a compression algorithm developed by Google and works best for text compression.)
How to set up Cloudflare
It is important to note before you start that to use Cloudflare, you will need to manage/change your domain’s nameservers. This step is not optional. If you do not have access to manage your domain’s nameservers, you will need to reach out to your domain administrator or support team.
Lets look at how we get set up:
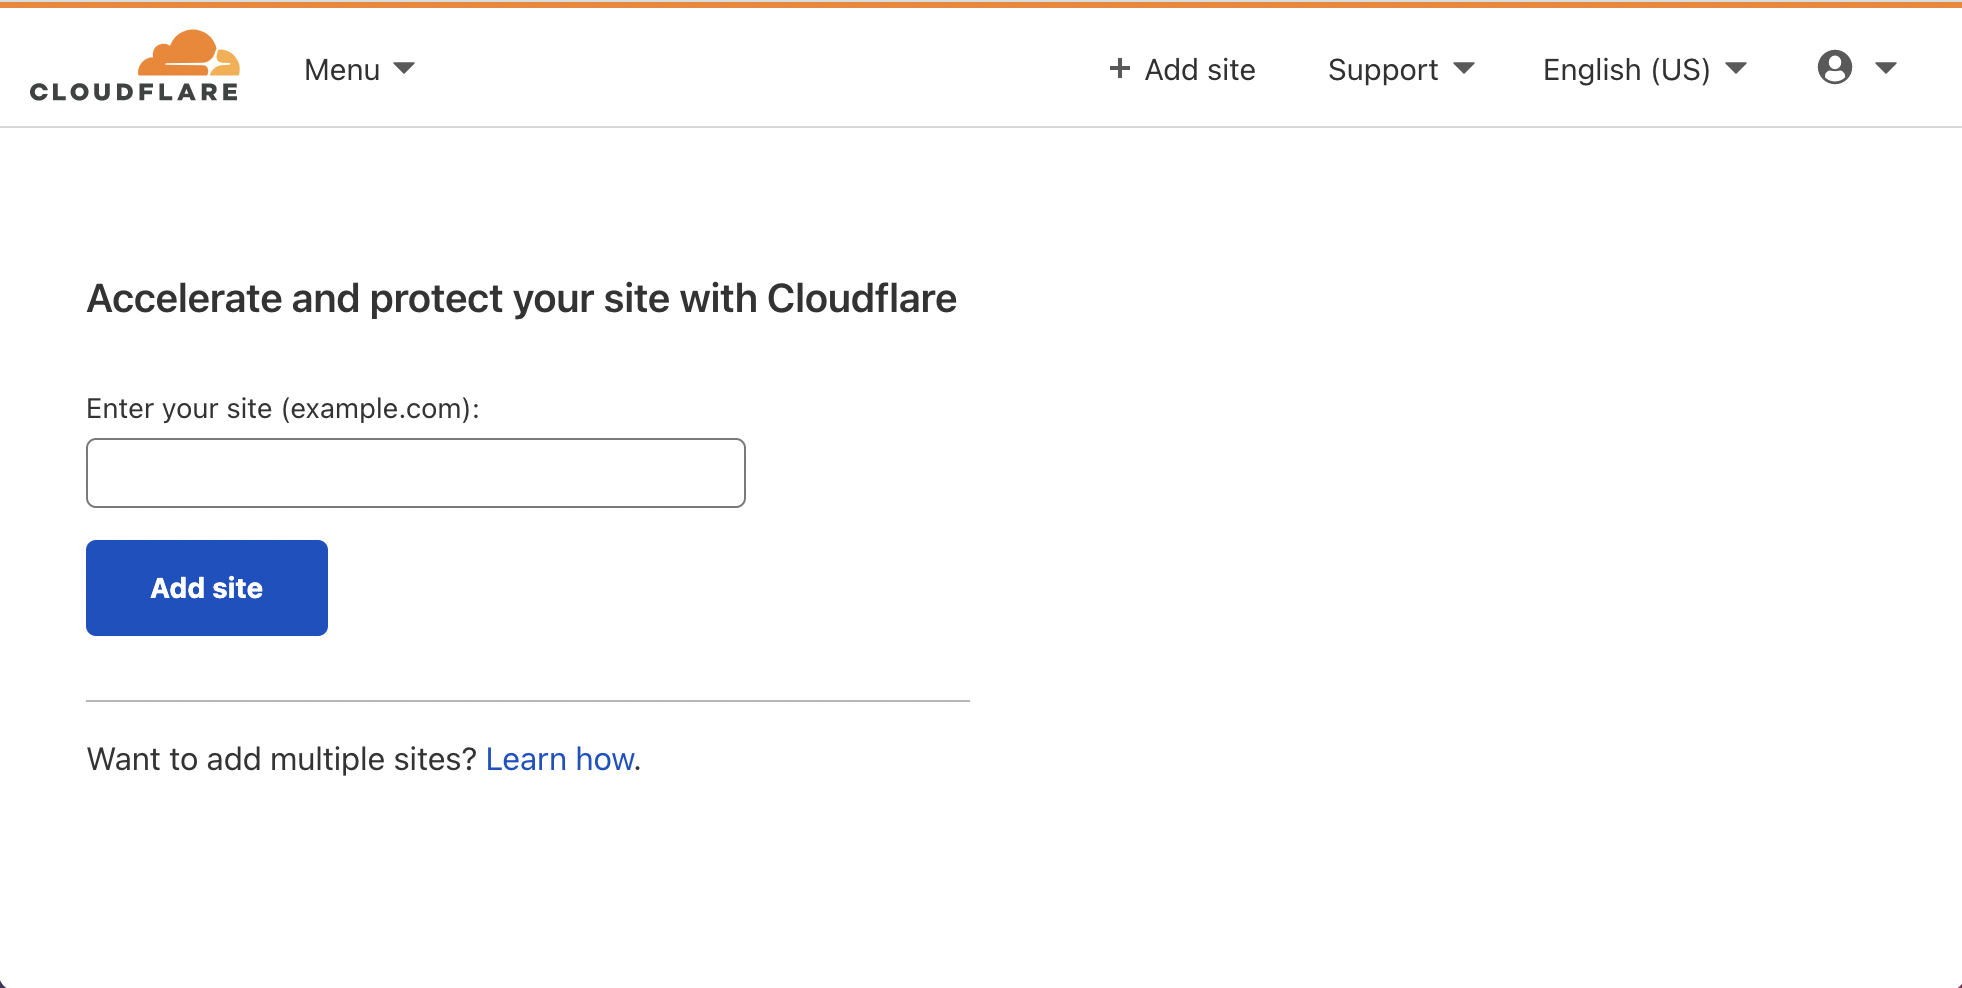
- Create a free Cloudflare account
Visit Cloudflare and sign up; you will be prompted to provide your site's domain (if you aren’t, click Add Site to see this screen)
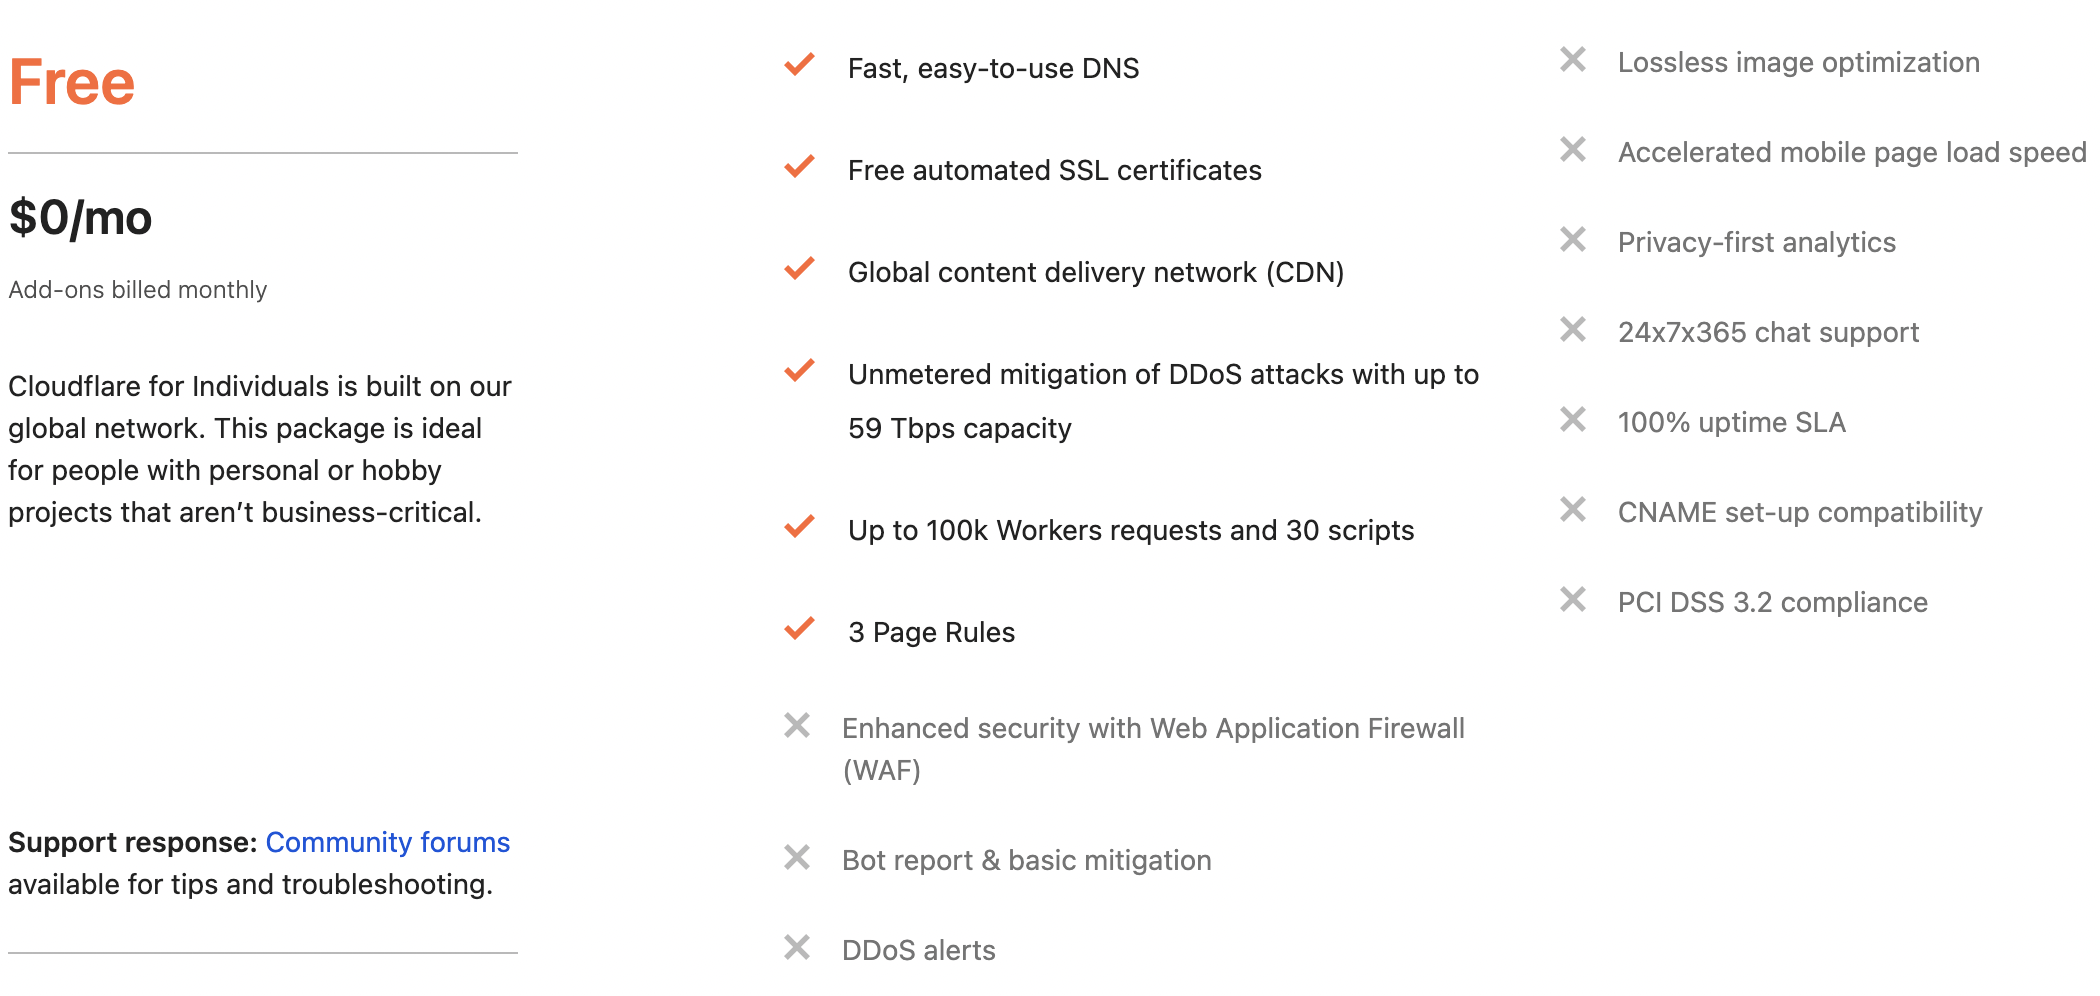
 You’ll then be asked to select a plan. Paid plans offer more features, but for now, you’ll probably want to start with the free plan; you’ll find this below the three paid plans. Click your chosen plan and continue.

- Verify DNS records
Once you’ve provided your domain and selected a plan, Cloudflare will check your existing DNS records and display them for you to verify. Don’t worry too much as long as you can see at least an A record with your domain and an IP address; you’re on the right track.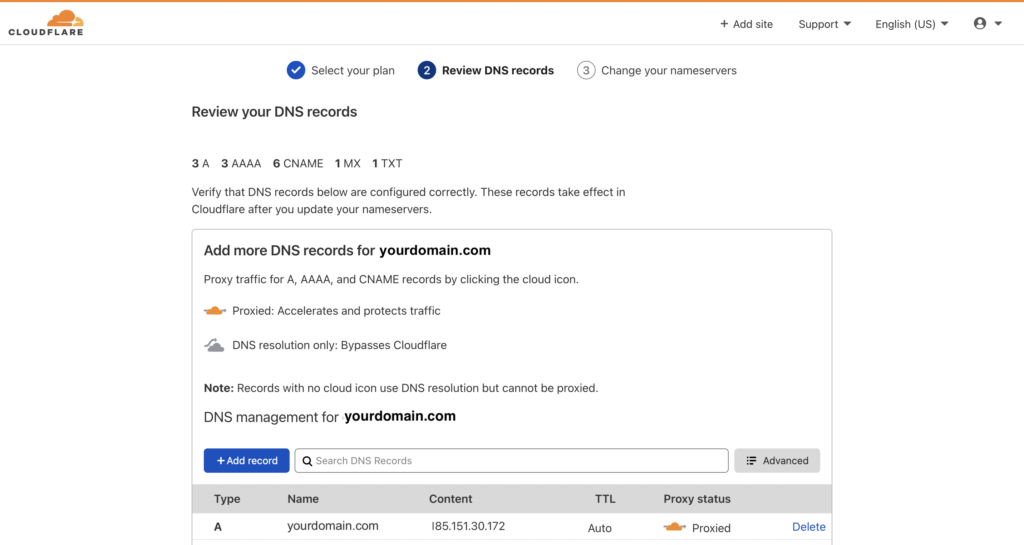
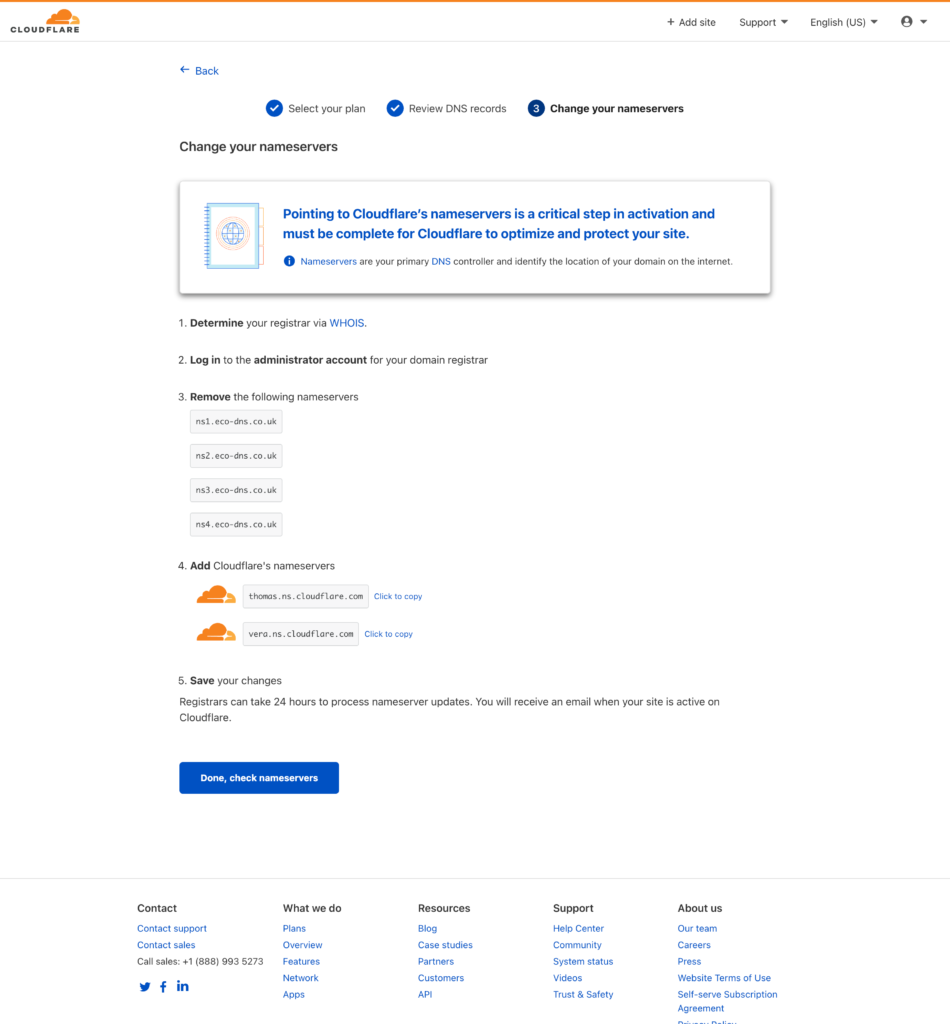
- Update your nameservers
This step is crucial. Cloudflare will display your current nameservers, the ones you need to remove and the two new nameservers you need to replace them with.
Here are some guides on how to change nameservers for some of the popular registrars:
Fasthosts GoDaddy Namecheap Bluehost SiteGround
Here is how you can update nameservers with Eco Web Hosting:
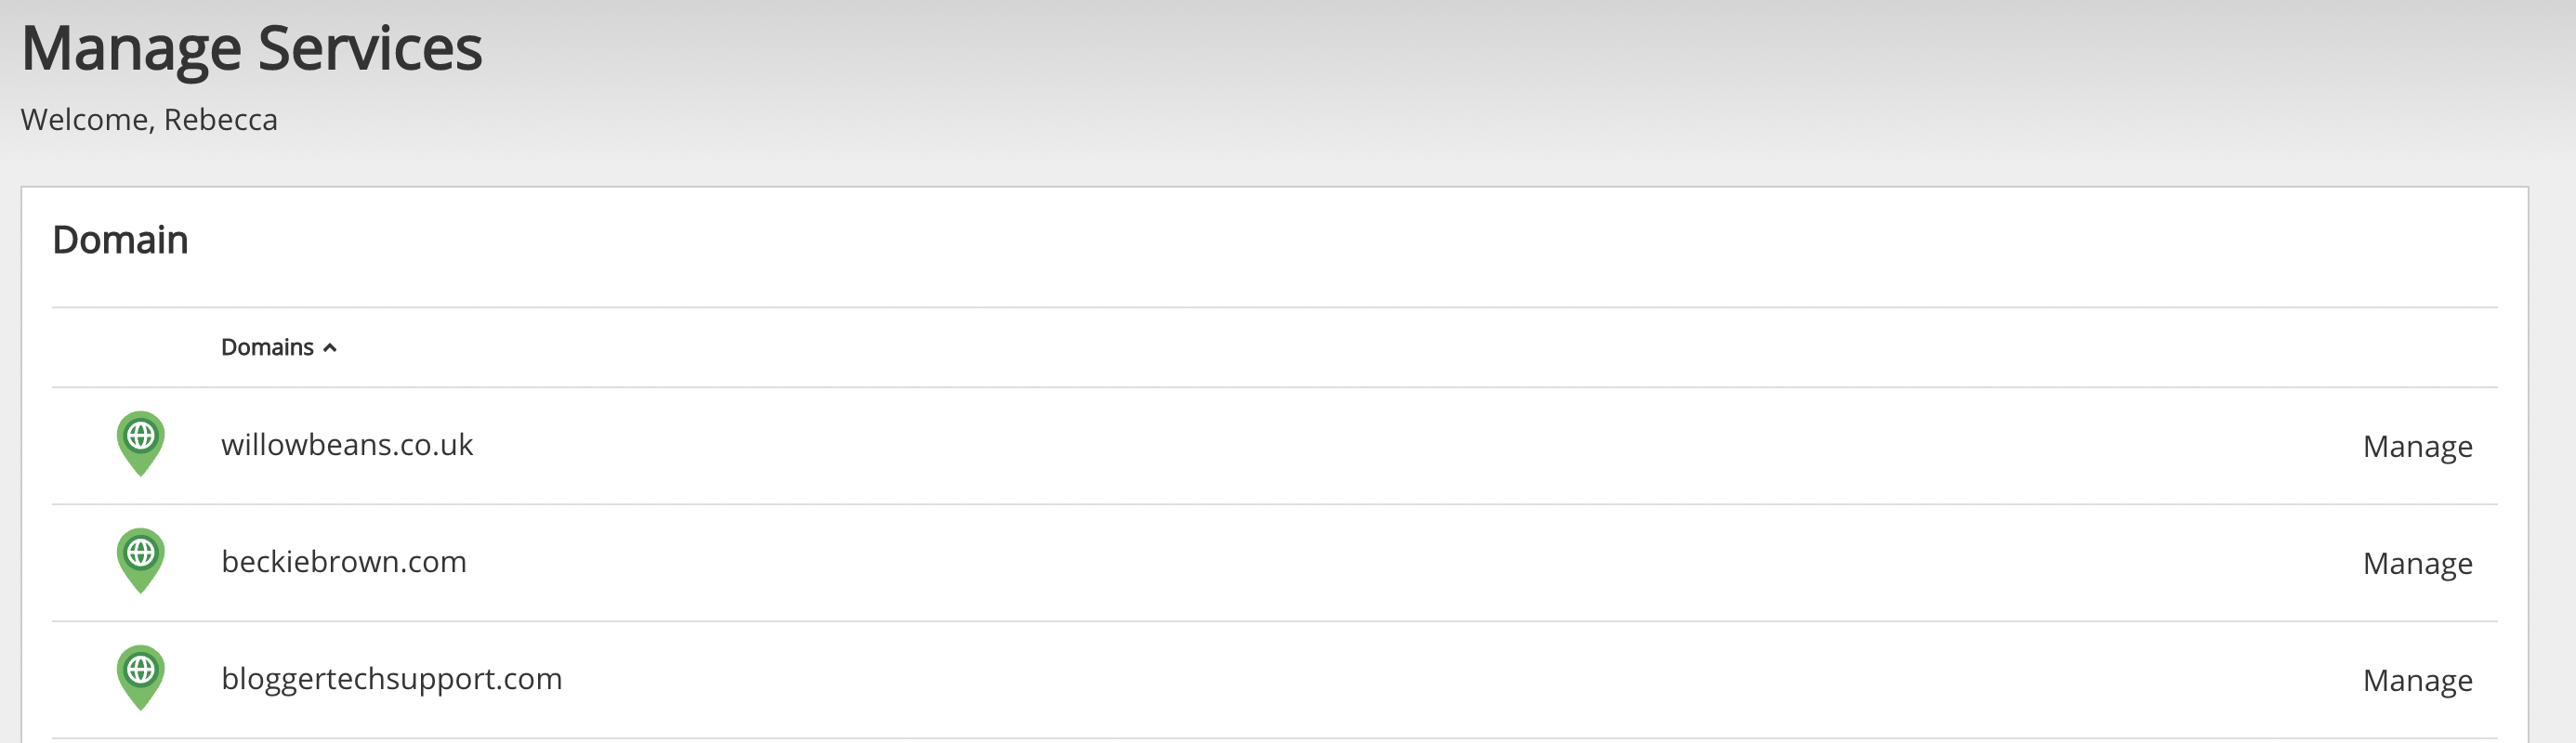
- Log in to your account dashboard at Eco Web Hosting
- Navigate to Manage Domains
- Click the domain name
- If you have multiple domains, you may need to click ‘Manage’ next to the relevant domain on the next page.
- Click on Nameservers
- Click ‘Custom Nameservers’ and then add the nameservers provided by Cloudflare in the boxes and hit ‘Update Nameservers’
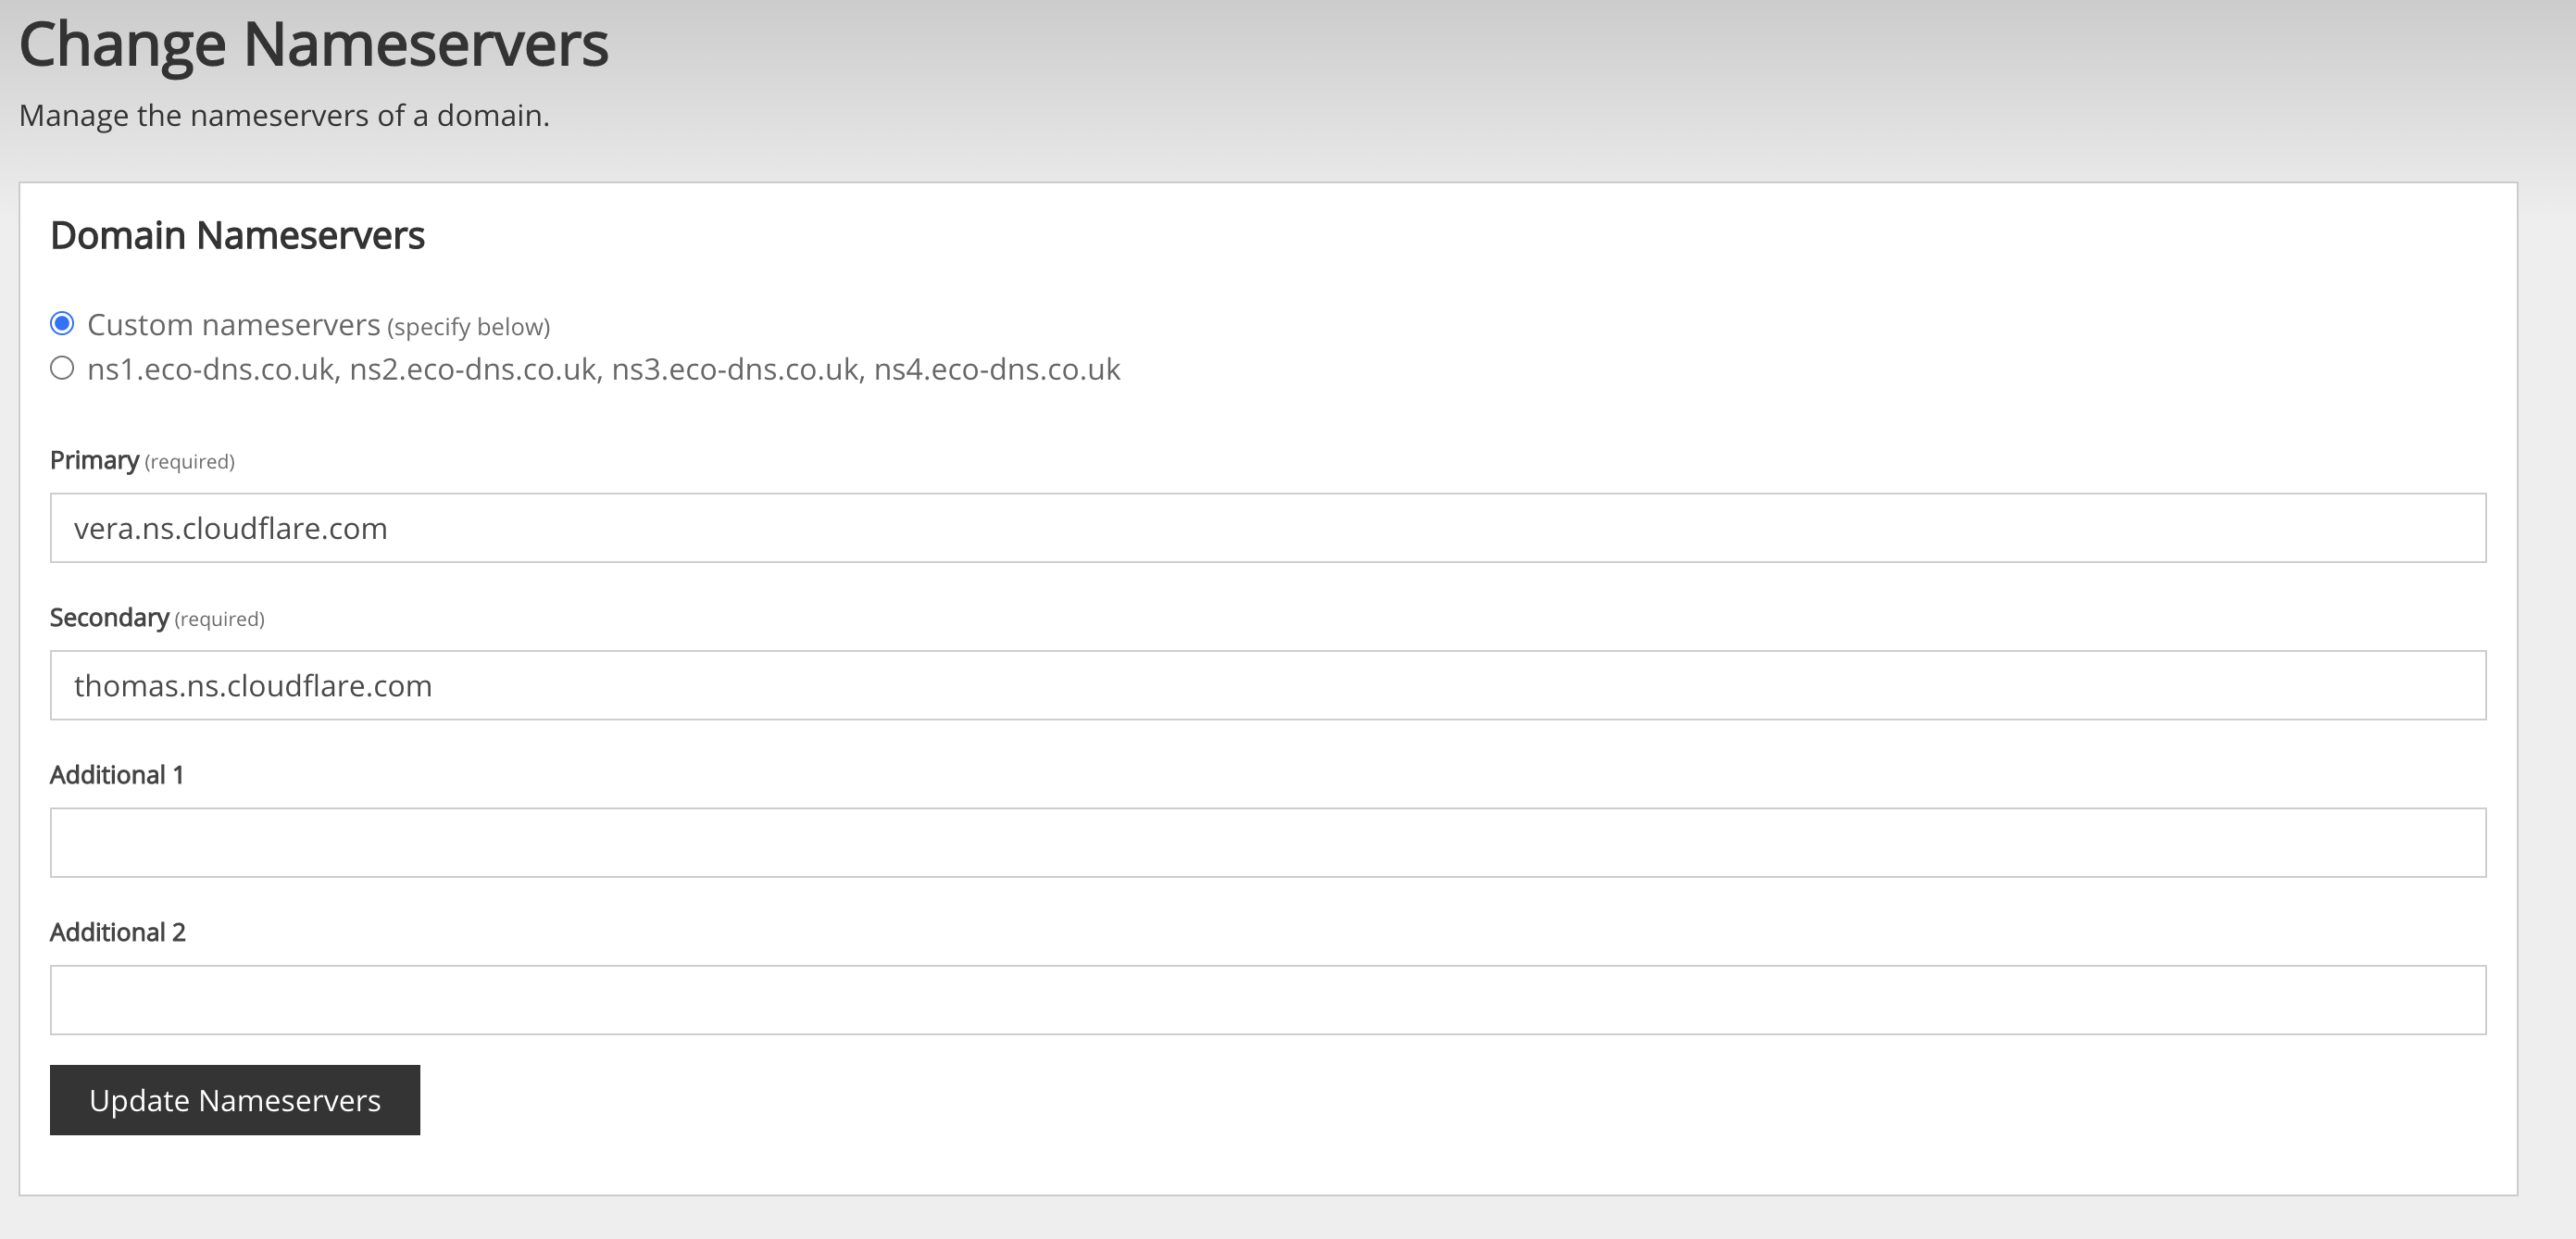
Note that some registrars may take up to 24 hours to update the nameservers.
Configure Your Basic Settings
Click on Speed in the row of blue buttons
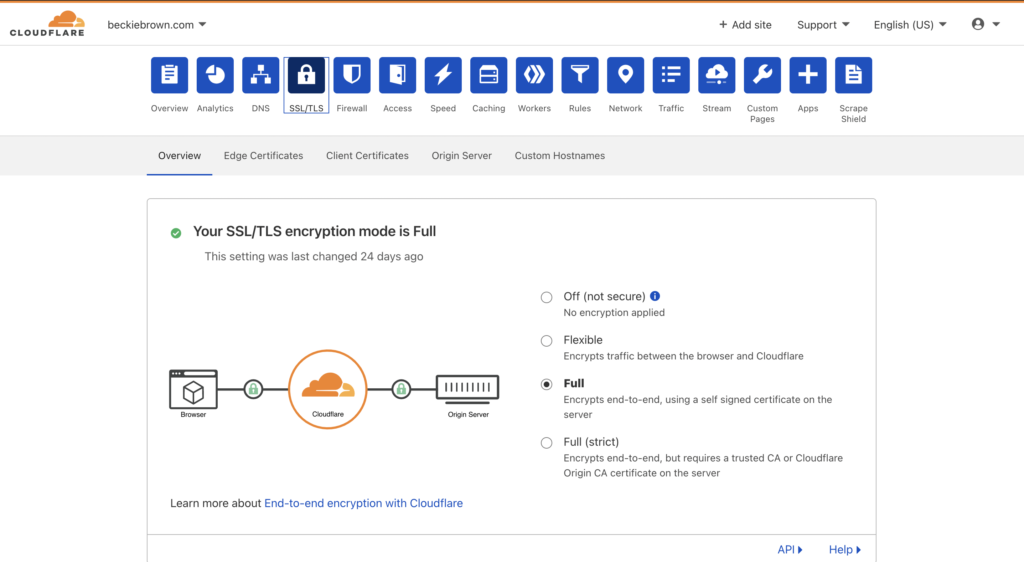
Here you can enable HTTPS. This will provide a security certificate for your site and show visitors your site is secure by displaying the little lock icon in the address bar. You may need to change your WordPress URL and Site URL in your WordPress setting to include https:// if it doesn’t already.
Next, move across to the optimisation tab
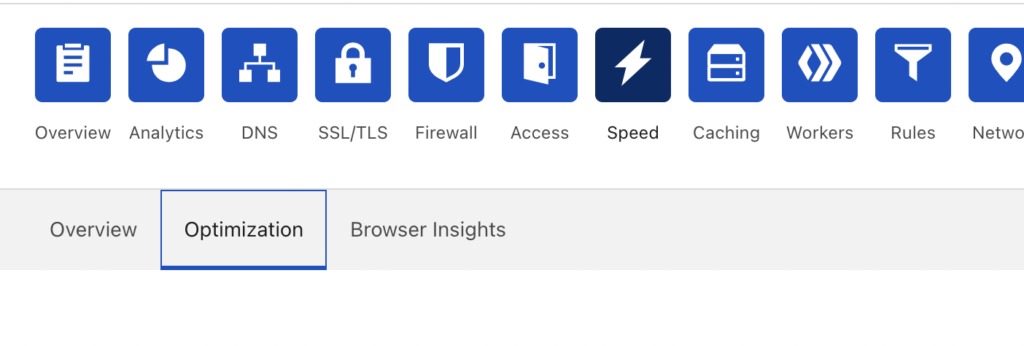
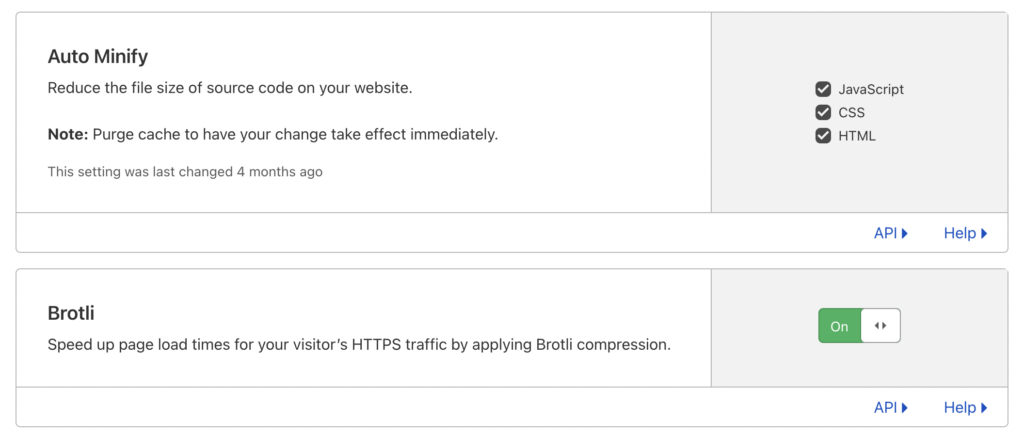
Here you can turn on auto minify for different files types and turn on Brotli compression to help with your site speed.
I hope this article has helped you set up Cloudflare for your WordPress website.